For The King II is a turn-based strategy RPG, so its controls are less about reflexes and more about navigating information quickly. During a campaign, the same controller is used to move heroes across Fahrul, inspect hexes, spend Focus, manage equipment, select Battle Grid positions and pass control between as many as four party members.
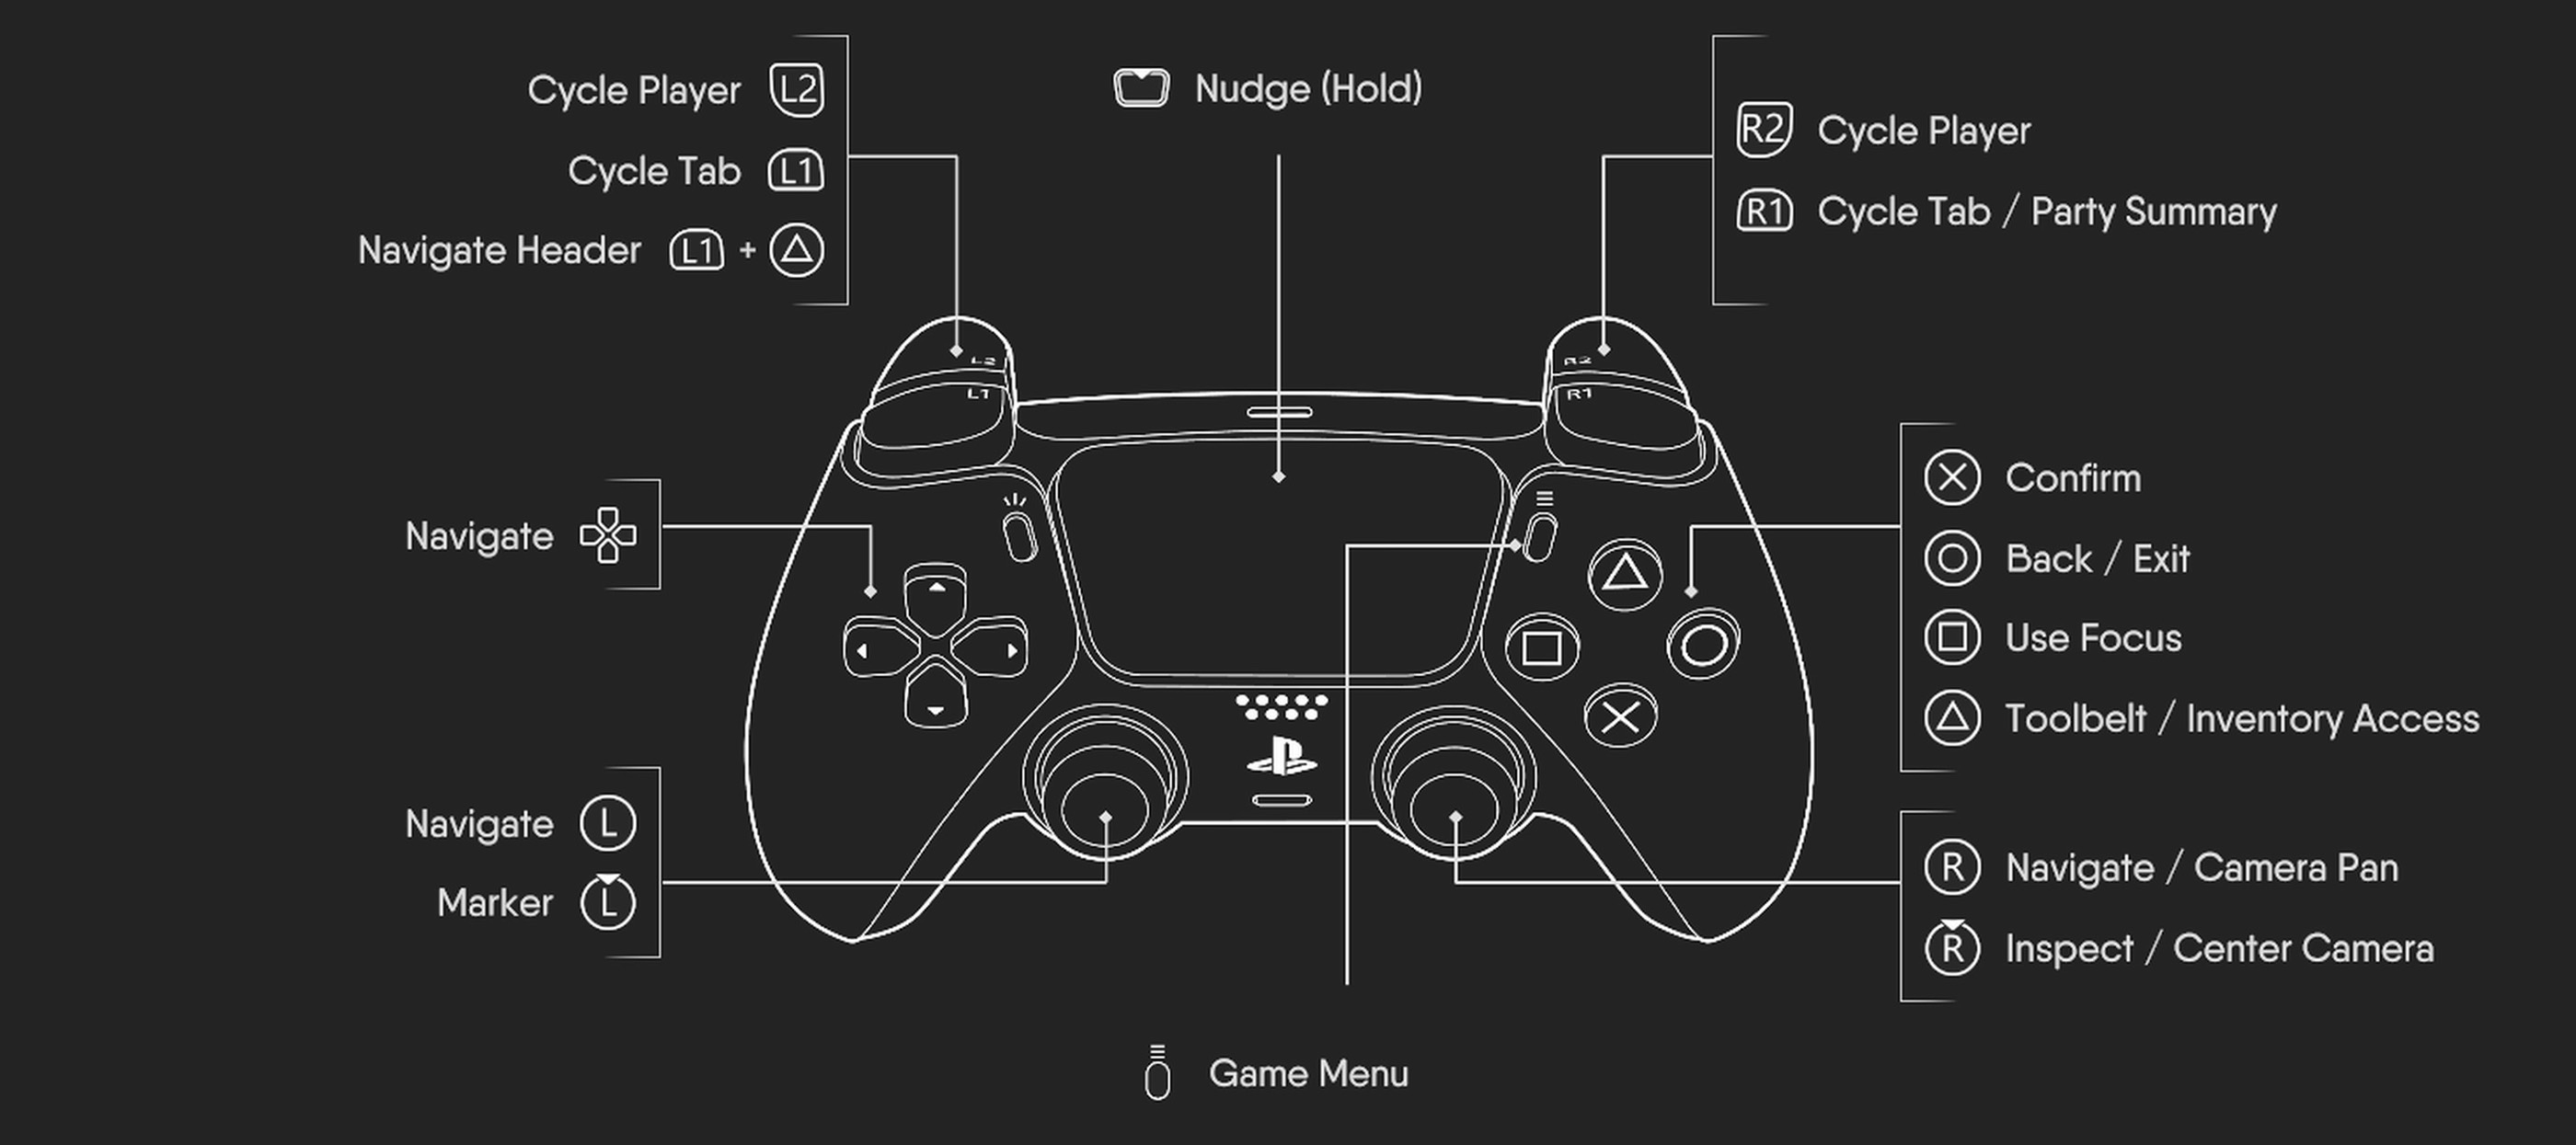
The attached PlayStation controller diagram confirms the default wireless controller layout. Cross confirms selections, Circle returns or exits, Square spends or manages Focus, and Triangle opens the Toolbelt or inventory. The left stick navigates menus and the overworld, while the right stick pans the camera. Pressing L3 places a marker, and pressing R3 inspects the highlighted object or recentres the camera.
The shoulder buttons are especially important in a full party. L2 and R2 cycle between heroes, while L1 and R1 move through tabs. R1 can also open the Party Summary, and holding the touchpad activates Nudge when that multiplayer prompt is available.
For The King II Controls
| Action | PlayStation | Xbox | PC |
|---|---|---|---|
| Navigate Overworld or Menus | Left Stick | Left Stick | Mouse / Assigned Navigation Keys |
| Navigate Interface | D-Pad | D-Pad | Mouse / Assigned Navigation Keys |
| Pan Camera | Right Stick | Right Stick | Mouse / Assigned Camera Controls |
| Confirm Selection | Cross | A | Left Click / Assigned Confirm Key |
| Back / Exit | Circle | B | Right Click / Esc / Assigned Back Key |
| Use Focus | Square | X | Displayed Focus Input |
| Open Toolbelt / Inventory | Triangle | Y | Assigned Inventory Input |
| Cycle to Previous Hero | L2 | LT | Displayed Previous Hero Input |
| Cycle to Next Hero | R2 | RT | Displayed Next Hero Input |
| Cycle to Previous Tab | L1 | LB | Displayed Previous Tab Input |
| Cycle to Next Tab | R1 | RB | Displayed Next Tab Input |
| Open Party Summary | R1 when Prompted | RB when Prompted | Displayed Party Summary Input |
| Navigate Header | L1 + Triangle | LB + Y | Displayed Header Navigation Input |
| Place Marker | Press L3 | Press Left Stick | Assigned Marker Input |
| Inspect Highlighted Object | Press R3 | Press Right Stick | Assigned Inspect Input |
| Centre Camera | Press R3 | Press Right Stick | Assigned Centre Camera Input |
| Nudge Another Player | Hold Touchpad | Hold View when Prompted | Displayed Nudge Input |
| Open Game Menu | Options | Menu | Esc / Assigned Game Menu Key |
| Select a Hex | Left Stick / D-Pad + Cross | Left Stick / D-Pad + A | Mouse + Confirm |
| Move on the Overworld | Highlight Valid Hex + Cross | Highlight Valid Hex + A | Select Valid Hex |
| Inspect a Hex, Town or Encounter | Highlight + R3 | Highlight + Press Right Stick | Hover / Inspect Input |
| Open Hero Inventory | Select Hero + Triangle | Select Hero + Y | Select Hero + Inventory Input |
| Spend Focus on Movement | Square when Movement Focus Is Available | X when Movement Focus Is Available | Displayed Focus Input |
| Select Battle Action | Navigate + Cross | Navigate + A | Mouse / Confirm Key |
| Cancel Battle Action | Circle | B | Right Click / Back Key |
| Spend Focus on an Attack | Square before Confirming Attack | X before Confirming Attack | Displayed Focus Input |
| Select Attack Target | Left Stick / D-Pad + Cross | Left Stick / D-Pad + A | Mouse + Confirm |
| Select Battle Grid Position | Left Stick / D-Pad + Cross | Left Stick / D-Pad + A | Mouse + Confirm |
| Inspect Skill or Item Details | Highlight + R3 | Highlight + Press Right Stick | Hover / Inspect Input |
| Use an Item | Triangle, Select Item, Cross | Y, Select Item, A | Open Inventory and Confirm Item |
| Equip an Item | Highlight Item + Cross | Highlight Item + A | Select Item + Equip |
| Give an Item to Another Hero | Select Item, Choose Give, Select Hero | Select Item, Choose Give, Select Hero | Select Item, Choose Give, Select Hero |
| End or Confirm Turn | Cross on Displayed Command | A on Displayed Command | Confirm Displayed Command |
PC note: For The King II supports keyboard and mouse as well as compatible controllers. Keyboard bindings and interface prompts can change after rebinding, so check the current Controls menu for the exact keys assigned to Focus, inventory, markers, camera movement and hero cycling.
How the Controller Layout Works
The controls are organised around three types of play: overworld exploration, combat and inventory management. Buttons retain similar roles across each screen, which makes the interface easier to learn.
- Cross / A: Confirm the highlighted action.
- Circle / B: Cancel, close or return to the previous screen.
- Square / X: Access Focus when the current action allows it.
- Triangle / Y: Open the Toolbelt, inventory or related equipment interface.
- L2 and R2: Cycle through party members.
- L1 and R1: Move through menu tabs and information pages.
- L3: Place a map marker.
- R3: Inspect the current target or centre the camera.
Always check the command legend displayed at the bottom of the screen. For The King II contains many contextual menus, and an input may gain an additional function when a particular panel is open.
Navigating the Overworld
Use the left stick or D-Pad to move the selection between nearby hexes. Press Cross or A to confirm movement to a valid destination.
The highlighted route shows where the active hero will travel. Before confirming, inspect:
- The number of movement points required.
- Any enemy or encounter blocking the route.
- The distance from the rest of the party.
- Nearby towns, sanctums and quests.
- Whether nightfall or another timeline event is approaching.
- Which hero should move first.
Do Not Confirm Long Routes Automatically
A distant destination may consume every available movement point or carry the hero through a dangerous encounter. Move in shorter stages when the route contains unexplored hexes.
Inspect Before Entering
Highlight a location and press R3 to read its information. Enemy levels, encounter types and other details can help you decide whether the party is ready.
Camera Controls
Use the right stick to pan the camera around the campaign map. Press R3 to centre the view again or inspect the highlighted object, depending on the current context.
Pan Ahead of the Active Hero
Survey the route before spending movement. Look for towns, boats, quest markers, dungeons and terrain that may affect the party's plan.
Use R3 When You Lose the Party
Large maps and fast camera movement can leave the active hero outside the view. Pressing R3 recentres the camera when the interface assigns that function.
Placing Map Markers
Press L3 to place a marker on the selected location. Markers are particularly useful in cooperative games where several players are discussing different routes.
Place markers on:
- The party's next objective.
- A town containing useful services.
- A dangerous enemy to avoid.
- A sanctum or shrine.
- A dungeon the group intends to revisit.
- A meeting point for separated heroes.
Use Markers Instead of Vague Directions
“Move north” can mean different things on a large hex map. A marker gives every player the same visible destination.
Remove Outdated Markers
Old markers can become confusing once a quest is complete or the party changes direction.
Cycling Between Heroes
Use L2 and R2 to cycle through the available party members. This is useful while reviewing equipment, comparing statistics or planning movement.
Check Every Hero Before Ending a Round
One party member may still need to:
- Equip recently acquired armour.
- Use a healing item.
- Visit a town service.
- Transfer gold or an item.
- Move closer to the group.
- Restore Focus.
Confirm the Active Hero
Before spending Focus or equipping an item, verify whose portrait is currently selected. Accidentally giving a weapon to the wrong character can create several unnecessary menu steps.
Using the Party Summary
R1 can open the Party Summary when the command appears. This screen provides a quick way to compare the group without opening every hero's inventory separately.
Use the Party Summary to check:
- Current health.
- Focus points.
- Equipped weapons and armour.
- Important resistances.
- Status effects.
- Gold and consumables.
- Whether a role is missing from the party.
Review the Summary Before a Dungeon
A party can appear healthy while one hero lacks a useful weapon or defensive item. Check the complete group before entering a multi-room challenge.
Opening the Toolbelt and Inventory
Press Triangle or Y to access the Toolbelt or inventory when the option is available.
The inventory is used to:
- Equip weapons, armour and accessories.
- Use consumables.
- Review quest items.
- Transfer equipment between nearby heroes.
- Compare statistics.
- Tag, sort or sell items where supported.
- Manage character loadouts.
Read the Complete Item Card
An item's attack value or armour number is only part of its usefulness. Inspect its skill rolls, status effects, immunities, penalties and targeting pattern.
Compare the Correct Character
Equipment is most effective when its main statistic matches the hero using it. A powerful weapon can still perform poorly in the hands of a character with a low relevant stat.
Using Focus
Press Square or X when the current action allows Focus to be spent. Focus can improve the reliability of many stat rolls and can also be used to gain movement under the correct circumstances.
Before spending Focus, consider:
- How important the action is.
- How many natural successes the hero is likely to roll.
- Whether a boss or dungeon is nearby.
- How soon Focus can be restored.
- Whether failure creates a serious penalty.
Focus Guarantees a Roll Slot, Not the Entire Outcome
Each point generally secures one relevant slot. A weapon with several slots may still have remaining rolls that can fail.
Spend Focus Before Confirming
Highlight the attack, movement or test, add the desired number of Focus points with Square or X, review the predicted roll and then confirm.
Do Not Spend Focus on Trivial Actions
Preserve it when failure causes little harm. Use it for dangerous attacks, important quest tests and movements that keep the party together.
Nudge Controls
Hold the touchpad when the Nudge prompt appears. Nudge is a cooperative communication feature intended to draw another player's attention to the current decision.
Use it when:
- A player may not realise it is their turn.
- The party is waiting for an equipment decision.
- A vote or confirmation has been left open.
- The group needs to continue after discussing strategy.
Do Not Repeatedly Nudge
Another player may be reading an item, checking statistics or considering a difficult decision. Use the command as a reminder rather than a substitute for communication.
Combat Controls
Combat remains turn-based. On the active hero's turn, navigate between available skills, select a target and press Cross or A to confirm.
A standard combat turn may include:
- Using a weapon skill.
- Changing position on the Battle Grid.
- Using an item.
- Spending Focus.
- Choosing a support or defensive ability.
- Targeting an enemy or ally.
Inspect Before Selecting
Use R3 or the displayed information command to examine unfamiliar abilities. Check their accuracy statistic, roll slots, damage type, area pattern and possible status effects.
Cancel Safely
Circle or B returns to the previous step before the action is confirmed. Use it when the wrong target or skill has been selected.
Selecting Battle Grid Positions
For The King II places each side on a tactical grid. Weapons and skills may strike different rows, columns or patterns, so position affects both offence and defence.
Use the directional controls to highlight a valid position and confirm it with Cross or A when movement is available.
Front Row
The front row is suited to durable heroes, shields and short-reach weapons. Characters here are more exposed but can help protect allies behind them.
Back Row
The back row is generally safer for fragile ranged or magical heroes, although enemies with reach, area attacks and displacement skills can still threaten them.
Check Weapon Reach
A hero moved into the back row may lose access to a short-range attack. Review the targeting pattern before changing position.
Do Not Cluster Without a Reason
Placing everyone in one row or column can make area attacks more dangerous.
Targeting Enemies
After choosing an attack, move the selection over an eligible target and confirm. The interface displays which enemies can be reached by the selected skill.
Read the Highlighted Pattern
Some attacks affect:
- One enemy.
- A complete row.
- A column.
- Adjacent spaces.
- Several random targets.
- Every combatant in a specified area.
Do Not Assume the Closest Enemy Is Best
A support enemy, summoner or opponent preparing a dangerous action may deserve priority over the front-row target.
Spending Focus in Combat
Highlight the desired skill and press Square or X to add Focus before confirming the attack.
Focus is especially valuable when:
- An enemy must be defeated before its next turn.
- The attack applies an important status effect.
- A miss would expose the party to major damage.
- A boss is vulnerable for a limited window.
- The selected weapon has several difficult roll slots.
Do Not Automatically Fill Every Slot
A high-stat hero may already have a strong natural success chance. Spending one point to secure the most important slot can be more efficient than guaranteeing the entire roll.
Using Items in Battle
Open the Toolbelt or inventory with Triangle or Y when item use is available. Select the required item, choose its target and confirm.
Battle items can provide:
- Healing.
- Focus recovery.
- Status removal.
- Temporary protection.
- Damage or control effects.
- Emergency revival where the appropriate item is available.
Do Not Wait Until a Hero Is Defeated
Use healing before the next enemy action can remove that character from the fight.
Check Who Carries the Item
Inventory access and item sharing can depend on party proximity and the current situation. Distribute emergency supplies before entering a dungeon.
Managing Equipment
Open the inventory, select an item and confirm the Equip command. Compare the new equipment with the currently worn piece before finalising the change.
Match Weapons to Statistics
Weapons test different character attributes. A hero with strong Awareness will normally use Awareness-based weapons more reliably than an Intelligence or Strength weapon with a larger damage number.
Count Roll Slots
A weapon with fewer slots can be more consistent, while a many-slot weapon may need stronger statistics or additional Focus.
Consider Damage Type
Physical and magical attacks interact differently with enemy defences. A balanced party should not rely exclusively on one damage type.
Keep Utility Equipment
Do not immediately sell every lower-damage weapon. A secondary weapon may provide an area attack, status effect or damage type needed in a later encounter.
Giving Items to Other Heroes
Select the item, choose the Give or transfer command and select the receiving character when the party's position allows sharing.
Transfer equipment when:
- Another hero has a better matching statistic.
- The healer needs more Godsbeard.
- A fragile hero lacks defensive equipment.
- One character is carrying too many unused consumables.
- A character is about to shop while holding most of the party's gold.
Do Not Hoard on One Character
If that hero becomes separated or incapacitated, the rest of the party may lose convenient access to essential supplies.
Using Shops and Services
Navigate the shop with the left stick or D-Pad, inspect items with R3 and confirm purchases with Cross or A.
Before buying, compare:
- The item's main roll statistic.
- Its attack skills and target pattern.
- Armour and resistance changes.
- Useful immunities.
- The party's remaining gold.
- Upcoming healing and service costs.
Use Shoulder Buttons to Compare Heroes
Cycle through the party with L2 and R2 to see who benefits most from an item before purchasing it.
Do Not Spend Every Coin on Damage
Keep enough gold for healing, curing, transport, quest requirements and emergency consumables.
Managing Landboats and Other Transport
Vehicles and boats are operated through contextual overworld commands. Select the vehicle or valid route and confirm the displayed action.
Before boarding or disembarking:
- Confirm which party members are close enough.
- Check the intended destination.
- Review remaining movement.
- Inspect nearby enemies.
- Avoid leaving an essential hero behind.
Keep the Party Together
Transport is most useful when it moves the complete group efficiently. A vehicle should not create a large separation immediately before a quest battle.
Game Menu
Press Options on PlayStation, Menu on Xbox or the assigned PC input to open the Game Menu.
The menu provides access to available options such as:
- Game settings.
- Audio and display options.
- Controls.
- Multiplayer information.
- Saving or quitting functions.
- Accessibility settings.
Pause Before Leaving a Multiplayer Session
Make sure the game state has been saved and that the rest of the party understands the session is ending.
Can the Controls Be Remapped?
Available remapping options depend on platform and current game version. PC players can review keyboard and mouse assignments, while console players should inspect the Controls or accessibility menu for supported changes.
When changing bindings, keep these actions convenient:
- Confirm and Back.
- Focus.
- Inventory.
- Hero cycling.
- Inspect.
- Camera centring.
Keep Focus Away from Confirm
An accidental Focus input can spend a limited resource. Distinct buttons help prevent unintended use.
Keep Inspect Easy to Reach
Reading item, enemy and skill information is fundamental to good decision-making.
Frequently Asked Questions
What are the default For The King II PlayStation controls?
Cross confirms, Circle goes back, Square uses Focus, Triangle opens the Toolbelt or inventory, L2 and R2 cycle heroes, L1 and R1 cycle tabs, L3 places a marker and R3 inspects or centres the camera.
How do you use Focus?
Press Square on PlayStation or X on Xbox while a movement roll, attack or eligible test is selected, then confirm the action.
How do you open the inventory?
Press Triangle on PlayStation or Y on Xbox when the Toolbelt or inventory command is available.
How do you change characters?
Use L2 and R2 on PlayStation or LT and RT on Xbox to cycle through the party.
How do you inspect an item or enemy?
Highlight it and press R3 or the right stick when the Inspect command is displayed.
How do you centre the camera?
Press R3 or the right stick when Centre Camera is the active contextual command.
How do you place a marker?
Highlight a location and press L3 or the left stick.
How do you open the Party Summary?
Press R1 or RB when Party Summary appears in the command legend.
What does Nudge do?
Nudge alerts another player that the group is waiting for their input or decision. Hold the touchpad when the command is available.
How do you move during combat?
Select a valid Battle Grid position with the directional controls and confirm it when the active skill or turn allows movement.
How do you spend Focus on an attack?
Select the attack, add the desired Focus with Square or X and then choose the target.
Can Focus make an attack completely accurate?
Each point generally guarantees one roll slot. Multi-slot actions may require several points to guarantee every slot.
How do you give an item to another hero?
Open the inventory, select the item, choose the transfer command and select an eligible nearby hero.
Can you play For The King II with a controller on PC?
Yes. The PC version supports compatible controllers as well as keyboard and mouse.
Can four players play together?
Yes. A party can contain four heroes, controlled alone or cooperatively through supported online and local multiplayer options.
What is the most important controller command?
Inspect with R3 is one of the most useful. Understanding an enemy, skill or item before confirming an action prevents many avoidable mistakes.
Final Control Advice
The For The King II control layout becomes intuitive once the face buttons are understood as four permanent interface roles: Cross confirms, Circle cancels, Square manages Focus and Triangle opens equipment or items.
Use L2 and R2 to compare heroes, place L3 markers before discussing routes and press R3 whenever an enemy, weapon or encounter is unfamiliar. The game rewards information more than speed, so inspect first and confirm only after the complete party plan makes sense.
Continue with our For The King II Tips and Tricks Guide for party composition, Focus management, Battle Grid positioning, equipment, pets, dungeons and campaign strategy.
Comments
No comments yet. Be the first to share your thoughts!