Dying Light uses an unusual but carefully designed control layout built around first-person parkour. Jump is placed on the right shoulder button so you can keep your right thumb on the camera while running across rooftops, grabbing ledges and lining up difficult landings.
The controls also change according to context. Square or X can reload, interact or use an object; Triangle or Y repairs a weapon when held but looks behind you while moving; and several actions gain entirely new functions when you play as the Night Hunter in Be the Zombie mode.
This guide covers the default human controls, keyboard and mouse commands, weapon repair, equipment selection, Survivor Sense, movement techniques and the separate Night Hunter control scheme.
Dying Light Human Controls
| Action | PlayStation | Xbox | PC Default |
|---|---|---|---|
| Move | Left Stick | Left Stick | W / A / S / D |
| Look Around | Right Stick | Right Stick | Mouse |
| Sprint | Press L3 | Press Left Stick | Hold Shift |
| Jump / Grab Ledge / Climb | R1 | RB | Space |
| Attack | R2 | RT | Left Mouse Button |
| Aim | Press R3 / Contextual Aim | Press Right Stick / Contextual Aim | Right Mouse Button |
| Kick | L1 | LB | E |
| Use Equipment | L2 | LT | Middle Mouse Button |
| Survivor Sense | Hold Cross | Hold A | Hold Q |
| Crouch | Circle | B | C |
| Reload / Interact / Use | Square | X | R to Reload / F to Interact |
| Repair Weapon | Hold Triangle | Hold Y | Hold R |
| Look Back while Running | Triangle | Y | B |
| Flashlight | D-Pad Up | D-Pad Up | T |
| Heal with Medkit | D-Pad Down | D-Pad Down | H |
| Cycle Equipment | D-Pad Left | D-Pad Left | 2 / 3 |
| Cycle Weapons | D-Pad Right | D-Pad Right | Mouse Wheel |
| Open Equipment Menu | Hold D-Pad Left | Hold D-Pad Left | Hold 1 |
| Open Weapon Menu | Hold D-Pad Right | Hold D-Pad Right | Hold Tab |
| Throw or Use Selected Item | L2 | LT | Middle Mouse Button |
| Grappling Hook | L2 when Equipped | LT when Equipped | Alt / Assigned Equipment Key |
| Open Player Menu | Touchpad | View Button | I |
| Open Map | Through Player Menu | Through Player Menu | M |
| Quest Journal | Through Player Menu | Through Player Menu | L |
| Skill Trees | Through Player Menu | Through Player Menu | U |
| Pause Game | Options | Menu Button | Esc |
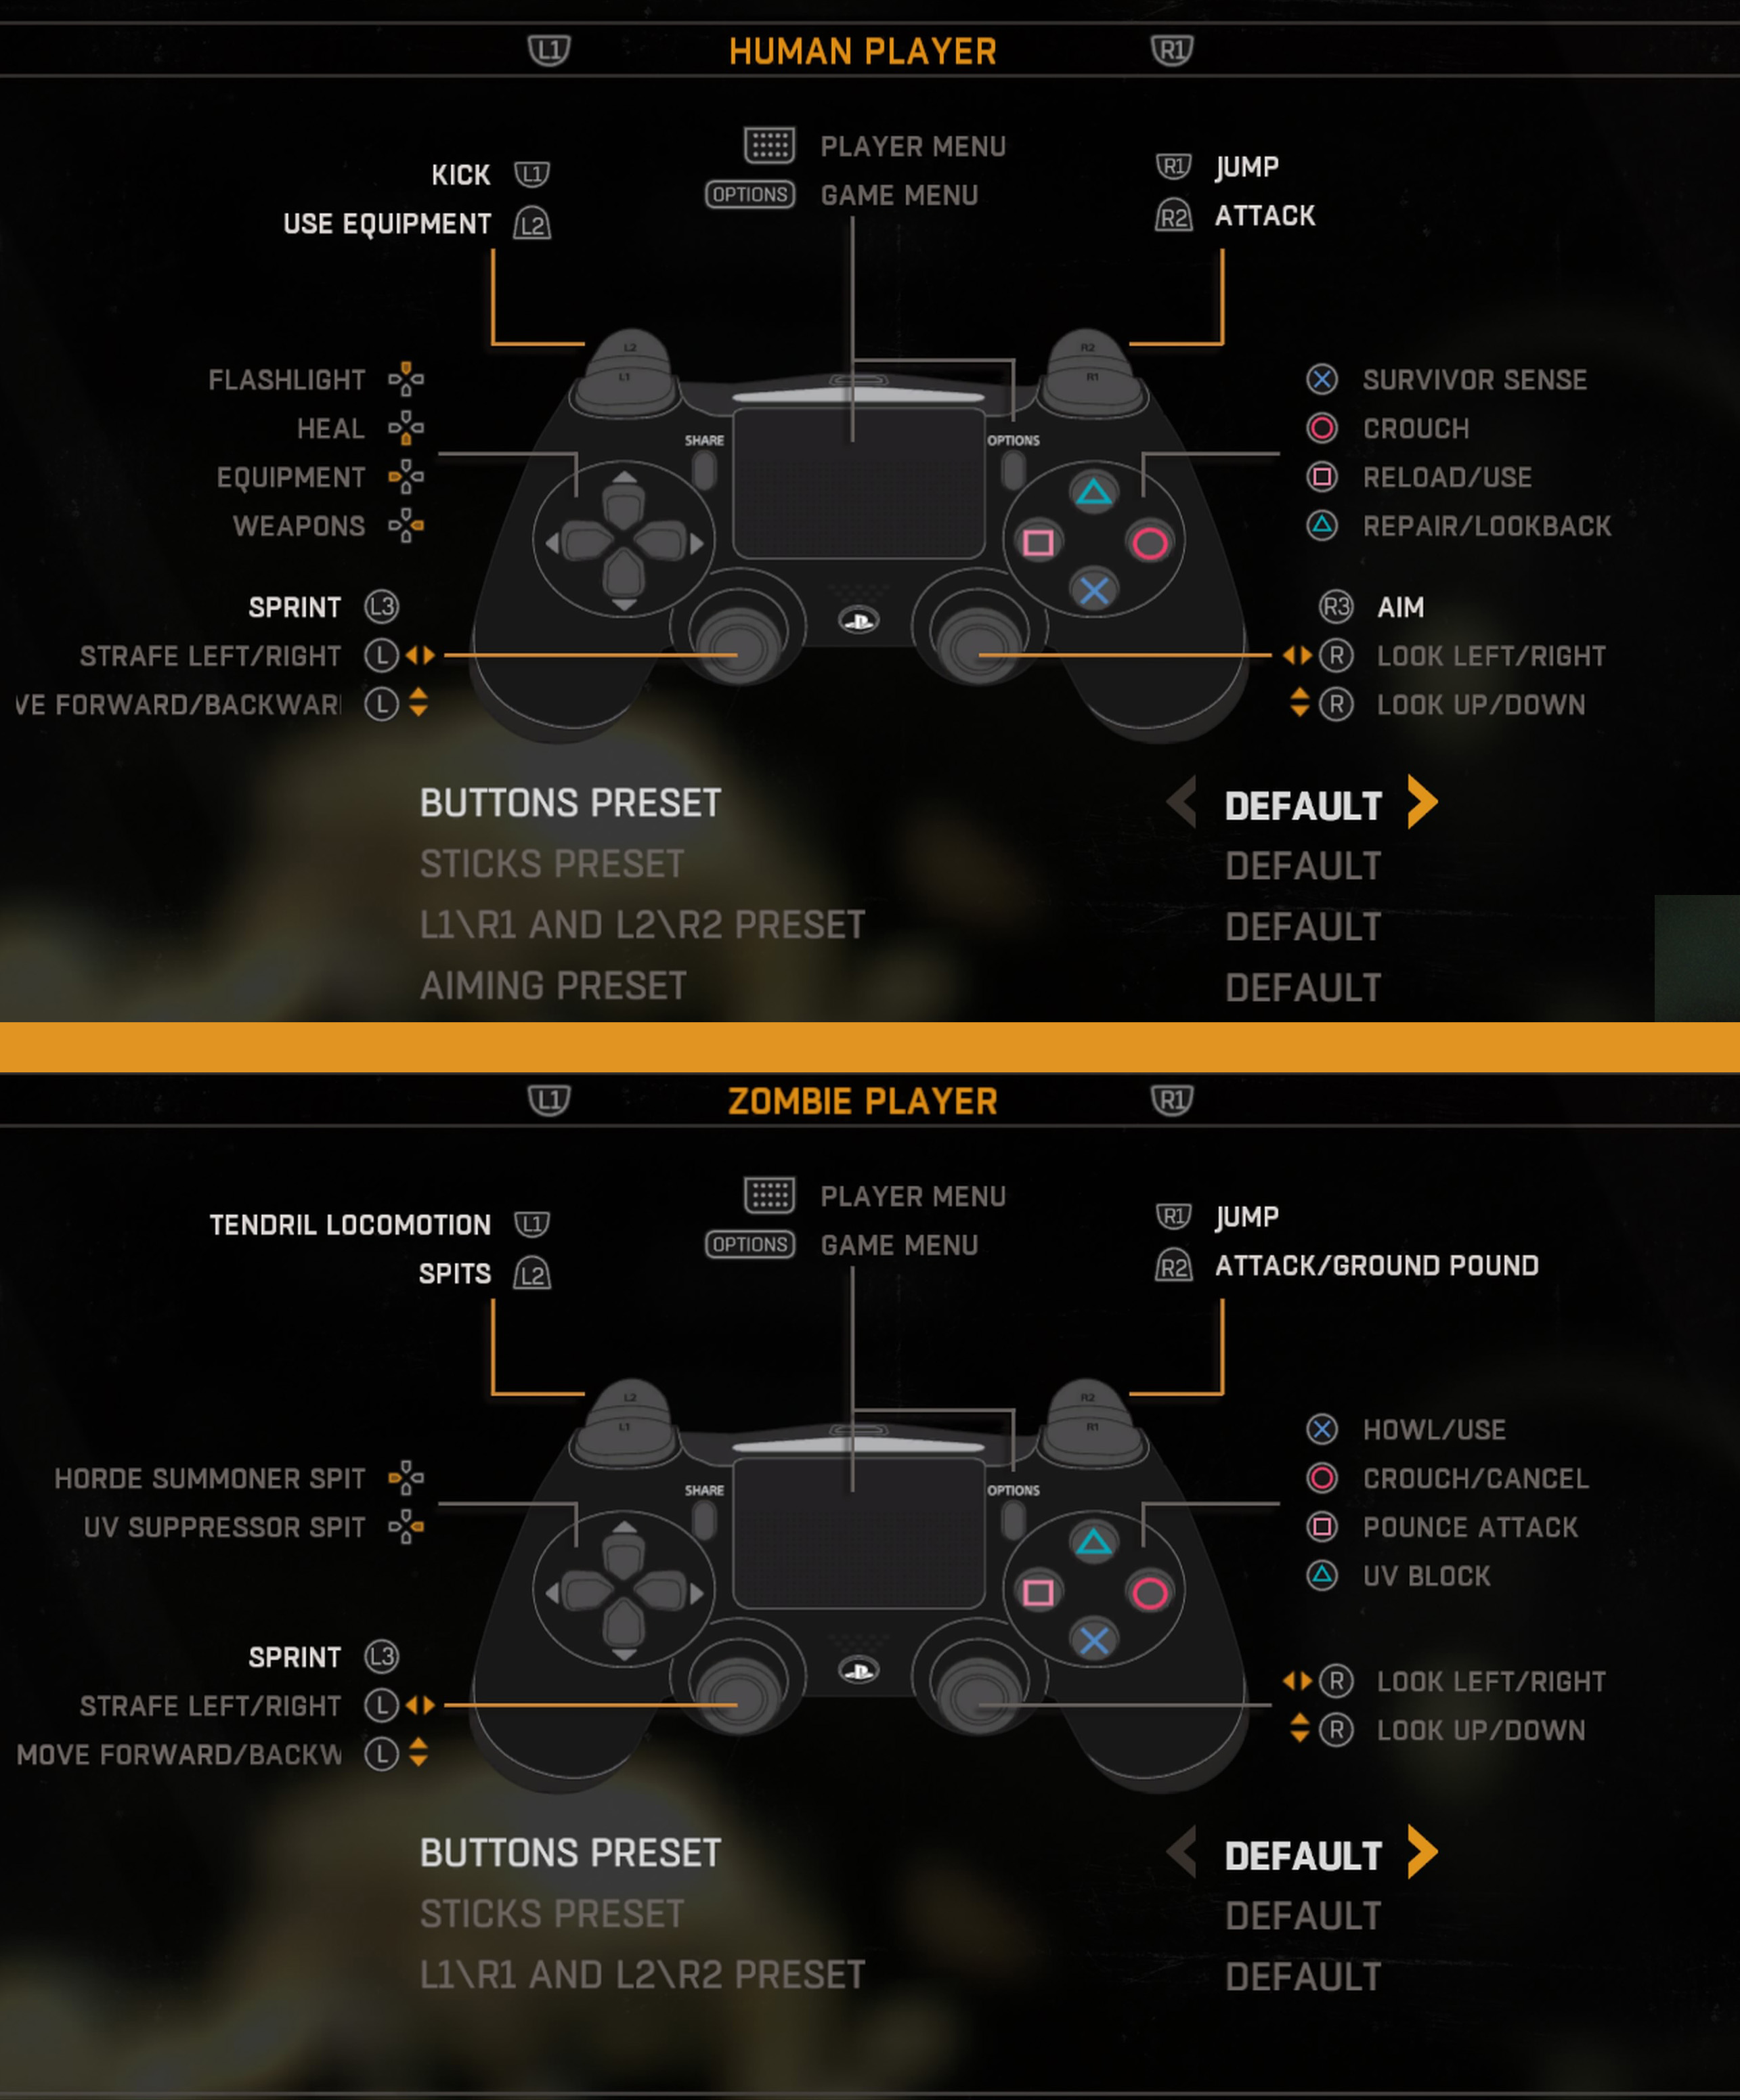
The console version includes alternative button, stick, shoulder-button and aiming presets. Individual PC commands can be changed from the key-binding menu.
Why Jump Is on R1 or RB
Dying Light places jump on the right shoulder button instead of a face button because movement frequently requires jumping and turning the camera at the same time. You can hold the right stick toward a ledge, press R1 or RB and continue adjusting your view without moving your thumb away from the camera.
The same command handles several parkour actions:
- Jumping from the ground
- Vaulting low obstacles
- Grabbing ledges
- Climbing walls and pipes
- Pulling yourself onto rooftops
- Activating certain unlocked parkour skills
Hold the Button When Reaching for a Ledge
A quick tap is enough for a normal jump, but holding R1, RB or Space while approaching a climbable edge gives Crane more opportunity to grab it.
Look at the Surface You Want to Grab
The parkour system responds to your camera direction. Aim at the top edge of a wall, balcony or rooftop rather than looking at the centre of the building.
Do Not Jump Too Early
Running closer to the edge before jumping produces more distance and makes the intended landing easier for the movement system to recognise.
Sprinting and Parkour Movement
Press L3 or the left stick while moving to sprint. On PC, hold Shift. Sprinting is essential for long jumps, slides, escaping Virals and maintaining momentum across rooftops.
Use Rooftops Instead of Streets
The ground is crowded with Biters, vehicles and narrow passages. Roofs usually provide cleaner routes, more escape options and valuable Agility experience.
Keep Moving after a Vault
Avoid releasing the movement stick after every obstacle. Maintaining forward pressure creates a smoother sequence of vaults, jumps and climbs.
Look before Leaping
A slightly slower approach is better than jumping into a dead end, barbed wire or a courtyard with no climbable exit.
Use Soft Landing Surfaces
Trash piles, awnings, car roofs and other forgiving surfaces can reduce or prevent fall damage. Do not assume every pile of debris is safe, however; check the landing area before committing.
Attacking
Press R2, RT or the left mouse button to attack with the equipped weapon. Melee weapons use stamina, and repeated uncontrolled swings can leave you unable to defend yourself or escape.
Aim at the Head
Head strikes are generally more efficient than repeatedly hitting an infected in the torso.
Let the Weapon Recover
Do not mash the attack button when stamina is nearly empty. Step back, kick or reposition while stamina returns.
Use Vertical Space
Attacking from the roof of a van, barricade or raised platform limits the directions from which infected can reach you.
Check Weapon Condition
Weapons lose effectiveness as their durability falls. A nearly broken weapon may be better saved, repaired or replaced before a difficult encounter.
Kicking
Press L1, LB or E to kick. Kicking deals modest direct damage but requires no weapon durability and is one of the safest early-game tools.
Kick Enemies into Spikes
Environmental spikes can kill ordinary infected immediately. Stand near the trap, allow the target to approach and kick it into position.
Kick Enemies from Heights
Rooftops, bridges and elevated walkways turn a simple kick into a powerful environmental attack.
Interrupt an Attacker
Use a kick to create distance when a Biter moves inside your weapon's effective swing range.
Do Not Kick Large Enemies Repeatedly
Heavy infected resist displacement and may punish you while the animation finishes. Use explosives, ranged weapons or terrain instead.
Using Equipment
Press L2, LT or the middle mouse button to use the currently selected equipment. Equipment includes firecrackers, throwing stars, Molotov cocktails, grenades, shields, UV lights and the grappling hook.
Select the Item before Combat
Cycle equipment with D-Pad Left or the assigned PC keys before entering a dangerous area. Searching through the equipment menu during a chase is rarely safe.
Firecrackers Are More Than Distractions
They can gather Biters around an explosive container, lure infected away from a doorway or create room to revive a cooperative partner.
Prepare the UV Light before Night Travel
The UV flashlight can interrupt or slow Volatiles long enough to reach a rooftop, trap or safe zone.
Use the Grappling Hook as an Escape Tool
Once unlocked, the hook is most valuable when it prevents a dangerous fall or removes you from a crowded street. It does not need to replace every normal climb.
Survivor Sense
Hold Cross, A or Q to activate Survivor Sense. It highlights nearby loot, useful objects and certain threats.
Scan Every Interior
Small crafting materials can blend into shelves, tables and dark corners. One brief scan often reveals several items that would otherwise be missed.
Use It before Lockpicking
Check the surrounding area first. Lockpicking leaves you vulnerable and a nearby infected can interrupt the attempt.
Scan during Night Travel
Survivor Sense helps identify nearby Volatiles and gives you time to choose another route.
Do Not Walk with the Effect Constantly Active
Frequent short scans are easier to read and less distracting than trying to navigate permanently through the altered display.
Crouching and Sliding
Press Circle, B or C to crouch. After unlocking the relevant Agility ability, crouching while sprinting performs a slide.
Use Crouch in Tight Interiors
Some openings, broken walls and gaps beneath obstacles require a lowered stance.
Slide beneath Attacks
A well-timed slide can preserve momentum while moving under hazards or past an enemy's reach.
Do Not Depend on Crouching for Complete Stealth
Dying Light is not built around permanent invisibility. Sound, enemy positioning and escape planning matter as much as posture.
Reloading and Interacting
Square or X performs several contextual actions on consoles. It reloads firearms, opens containers, collects objects, talks to characters and activates devices. PC separates reload onto R and interaction onto F.
Watch the Prompt
When several objects are close together, centre the camera on the intended target before pressing the button.
Reload before Entering a Building
Indoor fights leave less room to retreat. Check the magazine while you still have space and visibility.
Close Doors when Useful
Some doors can interrupt pursuing infected or buy a few seconds to heal and change equipment.
Repairing Weapons
Hold Triangle or Y when the repair prompt is available. On PC, hold R. Repairs consume metal parts and each weapon has a limited number of repairs.
Do Not Repair after Minor Damage
A repair restores a significant amount of durability but still consumes one of the weapon's limited repair slots. Wait until the condition has fallen enough to justify it.
Check the Remaining Repair Count
A powerful weapon with no repairs left may be unreliable for a long mission.
Save Metal Parts
Dismantle unwanted low-value weapons when appropriate and loot toolboxes, workshops and vehicles.
Do Not Become Attached to Early Weapons
Higher Survivor Rank steadily introduces stronger equipment. Replacing an old weapon is often more efficient than repeatedly maintaining it.
Looking Back while Running
Press Triangle, Y or B while moving to look behind Crane. This is especially useful during a Viral pursuit or nighttime chase.
Use It Only Briefly
The command helps you judge distance, but staring backward too long makes it easy to collide with a wall or miss a jump.
Check whether the Pursuit Has Broken
A quick glance can show whether you have enough room to heal, change equipment or turn toward a trap.
Do Not Fight Every Pursuer
The purpose of looking back is often to confirm that running is still the best decision.
Flashlight Controls
Press D-Pad Up or T to toggle the flashlight.
Use It inside Buildings
Dark interiors hide loot, floor openings and infected lying behind furniture.
Turn It Off when It Is Unnecessary
Natural daylight and environmental lighting are often sufficient. Switching it off also keeps dark scenes easier to read without a bright central glare.
Do Not Confuse It with the UV Flashlight
The normal flashlight provides visibility. The UV light is an equipment item used against sensitive infected, especially Volatiles.
Healing
Press D-Pad Down or H to use a medkit when one is available.
Heal before Critical Health
Do not wait until one additional hit will kill you, particularly during a chase.
Break Line of Sight First
Healing takes time. Climb onto a roof, enter a room or use a distraction before beginning the action.
Keep Gauze and Alcohol
These common materials are central to medkit crafting. Avoid using all of them on unnecessary blueprints.
Search Bathrooms and Medical Areas
Medicine cabinets, pharmacies and clinics are natural places to find healing supplies.
Weapon and Equipment Menus
Hold D-Pad Right to open the weapon selector and hold D-Pad Left to open equipment selection. On PC, hold Tab for weapons and 1 for equipment.
Assign Different Weapon Roles
A useful setup contains a dependable melee weapon, a powerful emergency weapon, a ranged option and a lower-value tool for ordinary Biters.
Keep Firecrackers Ready
They solve more situations than almost any other early equipment item.
Avoid Using the Best Weapon on Every Target
Save valuable durability and expensive modifications for dangerous enemies or missions.
Player Menu
Press the touchpad, View button or I to open the player interface. From here you can manage inventory, blueprints, quests, skills and the map.
Check New Blueprints
A newly acquired blueprint may produce a useful weapon modification or consumable you have not yet equipped.
Spend Skill Points Promptly
Unused points provide no benefit. Open the appropriate skill tree when a notification appears.
Compare More Than Damage
Weapon handling, durability, repairs and modification slots can matter as much as the headline damage number.
Controller Presets
The console control menu provides separate presets for buttons, sticks, shoulder buttons and aiming.
- Buttons Preset: Changes the general face-button arrangement.
- Sticks Preset: Adjusts movement and camera stick behaviour.
- L1/R1 and L2/R2 Preset: Swaps shoulder and trigger commands.
- Aiming Preset: Changes how ranged aiming is activated.
Test a new preset in a safe area before beginning a mission or leaving a safe zone at night.
Dying Light Be the Zombie Controls
Be the Zombie mode lets one player control a Night Hunter that invades a human session. The Night Hunter has a separate movement and attack layout based around tendril locomotion, pounces, ground pounds, UV defence and specialised spit abilities.
| Night Hunter Action | PlayStation | Xbox | PC |
|---|---|---|---|
| Move | Left Stick | Left Stick | W / A / S / D |
| Look Around | Right Stick | Right Stick | Mouse |
| Sprint | Press L3 | Press Left Stick | Shift |
| Jump | R1 | RB | Space |
| Claw Attack / Ground Pound | R2 | RT | Primary Attack |
| Tendril Locomotion | L1 | LB | Assigned Tendril Key |
| Use Spit | L2 | LT | Assigned Equipment Key |
| Howl / Use | Cross | A | Interact Command |
| Crouch / Cancel | Circle | B | C |
| Pounce Attack | Square | X | Assigned Pounce Key |
| UV Block | Triangle | Y | Assigned UV-Block Key |
| Horde Summoner Spit | D-Pad Direction | D-Pad Direction | Assigned Spit Selection |
| UV Suppressor Spit | D-Pad Direction | D-Pad Direction | Assigned Spit Selection |
| Player Menu | Touchpad | View Button | I |
| Pause | Options | Menu Button | Esc |
Tendril Locomotion Explained
Hold L1 or LB while aiming at a valid surface to pull the Night Hunter through the environment. Tendrils provide far more speed and vertical freedom than ordinary running.
Chain between Buildings
Release one surface only after lining up the next attachment point. Smooth chains make it difficult for human players to track your approach.
Attack from Unexpected Angles
Approach from a roof, wall or dark side street instead of moving directly along the ground.
Retreat before UV Energy Is Depleted
The Night Hunter is vulnerable to sustained UV exposure. Tendrils are often better used to escape and reset than to force one more attack.
Pounce Attack
Square or X initiates a pounce when the target and conditions allow it.
Remove UV Protection First
A prepared survivor can interrupt the attack with UV light. Suppress, distract or approach from outside the player's immediate view.
Do Not Telegraph the Approach
Running directly toward a human gives them time to aim the UV flashlight.
Use Height
Dropping from an elevated position shortens the target's reaction time.
Ground Pound and Claw Attack
R2 or RT performs the Night Hunter's standard attack and can activate a ground pound under the correct conditions.
Separate Groups
A ground pound can disrupt several survivors and create an opening for another ability.
Do Not Remain in UV Light
Claw damage is rarely worth losing your mobility and energy beneath sustained UV exposure.
Attack after a Survivor Misses
Punish missed dropkicks, tackles and thrown equipment rather than trading attacks directly.
Spit Abilities
Use the D-Pad to choose an available spit and press L2 or LT to launch it.
UV Suppressor Spit
Use it to reduce a survivor's ability to defend against pounces and close attacks.
Horde Summoner Spit
Use it to create pressure, interrupt revives and force humans away from comfortable positions.
Aim at the Escape Route
A spit does not always need to hit the player directly. Cover a ladder, doorway or nest approach to control movement.
Frequently Asked Questions
How do you jump in Dying Light?
Press R1 on PlayStation, RB on Xbox or Space on PC.
How do you sprint?
Press L3 or the left stick while moving. Hold Shift on PC.
How do you use Survivor Sense?
Hold Cross on PlayStation, A on Xbox or Q on PC.
How do you kick?
Press L1, LB or E.
How do you use equipment?
Press L2, LT or the middle mouse button.
How do you heal?
Press D-Pad Down or H when you have a medkit.
How do you turn on the flashlight?
Press D-Pad Up or T.
How do you repair a weapon?
Hold Triangle, Y or R when the weapon has repairs available and you possess the required metal parts.
How do you look behind you while running?
Press Triangle on PlayStation, Y on Xbox or B on PC.
How do you change weapons?
Press D-Pad Right to cycle or hold it to open the weapon selector. Use the mouse wheel or hold Tab on PC.
How do you select different equipment?
Press D-Pad Left to cycle or hold it to open equipment selection.
Why is jump assigned to R1 or RB?
It lets you jump, grab ledges and rotate the camera at the same time without removing your thumb from the right stick.
Can the controls be changed?
Console players can choose several control presets, while PC players can remap individual keyboard and mouse commands.
Are the Night Hunter controls different?
Yes. Be the Zombie mode replaces normal human equipment and combat actions with tendrils, pounces, claw attacks, UV defence and spit abilities.
Final Control Advice
Begin by learning four commands until they become automatic: R1 or RB for parkour, L1 or LB for kicking, Cross or A for Survivor Sense and Triangle or Y for looking back during a chase. These actions are more important to early survival than complicated weapon combinations.
Practise moving across rooftops without stopping after each jump. Look toward every intended ledge, hold the jump command long enough to grab it and use the camera while airborne. Dying Light becomes dramatically easier once movement feels like one continuous route rather than a series of isolated jumps.
See our Dying Light Tips and Tricks Guide for combat, parkour, weapon, crafting and nighttime survival advice.
Comments
No comments yet. Be the first to share your thoughts!